We bought some transom wheels for inflatable boats but the instructions were not as detailed as we would have liked. Check out what we learned about installing these transom wheels.
Package Contents & Tools Needed
First, always check your package contents and make sure all of your parts have been delivered. Second, make sure you have the tools necessary to complete the installation. You will need the following tools.
- Wrenches
- Drill
- Level
- Tape Measure
- Pen/Pencil
- Marine Grade Water Sealant for Bolt Holes
- Extra washers and/or metal plate

Choose Mounting Location
There are several considerations when choosing where to mount your transom wheels.
- Choose a location that keeps the wheels far away enough so that they don’t hit the pontoon.

- Choose a location on the transom that ensures you are not drilling through something important on the other side. For this boat, there are tabs at the bottom of the transom that holds the metal floor in place.

Use your tape measure to locate the limits, high and low, where you can drill and not damage other important items in your boat.

Transom Wheel Installation
- First, level the boat. This isn’t necessary but it can help with your installation.

- Next, place your bracket where you want it positioned and make sure it is level, vertically.

- Now, mark the holes where you will need to drill and then drill your holes.

- Now, insert your bolts with washers.

- This is where we need to stop and add some information to the instructions. The manufacturer did not provide washers for the inside of the bolt with the finish nuts and the nuts started getting sucked into the marine grade plywood, enough so it concerned us and we decided to add a washer.

- We recommend you add a metal bracket around all four bolt holes instead of only using washers, similar to the bracket on the back side of the transom.
- Add marine grade water sealant to the bolt holes.
- Now, insert the bolt through the transom arm, add the regular nut and washer to the opposite side of the arm, then slide the wheel on.

- Next, add the washer and finish nut and tighten.

- Lastly, pick up one side of the boat and insert the bolts and snap into place.

Finished Product
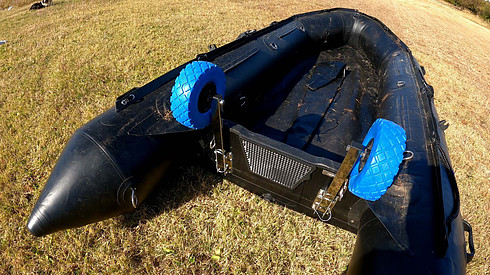
You can see in the image below, what the BRIS inflatable raft looks like with the transom wheels extended down.

Here is the BRIS boat with the wheels in the upright and locked position, if you would prefer to keep the wheels on while using the raft.

You can see and imagine how much easier it is to transport the inflatable raft with the transom wheels on, rather than two people carrying it or even worse, dragging it by yourself.

Final Thoughts
We transported the BRIS Inflatable raft several times without the transom wheels, and it became obvious we needed the wheels and after our last trip to the Arkansas River, near Salida, Colorado, we were thankful to have the transom wheels to make our lives much easier.
See the YouTube video below for more information on installing the transom wheels.
Read more about Mike’s open box and setup of his new BRIS inflatable boat HERE.

- Recommended max. weight: 136 kgs.
- Solid tires size: 10'' x 3 ''
- Stainless steel bracket width : 35 mm
- Shipping weight: 5 kgs
- CAUTION: The launching wheels is not designed to be towed behind a vehicle.
This product was presentation was made with AAWP plugin.
Please Like, Subscribe, Share, Turn on Notifications and Leave a Comment below.
Return to Home Page